Showing posts with label stripping. Show all posts

Sunday 3 July 2011

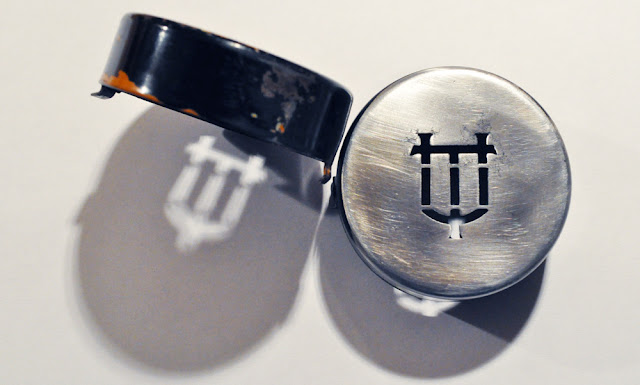
Silver surfer

Several pints of elbow grease later, the last of the paint is gone.


If you'd like a print, I have arranged with BWC Photo Imaging, Dallas, Texas to supply them in various finishes and on canvas. Just click the image for the link. 20% of all profit will be donated to charity: Wallingford Rowing Club Weights Shed Appeal .

Thursday 30 June 2011

Silver dream machine

 ...well, not quite. I put it back together to see just how good the finish on the inside needed to be. Turns out it is good enough. I used a wire brush in the electric drill to get the paint off the inside, so it isn't anywhere near a mirror finish. You can see there's still the odd patch of paint to come off, and then the whole thing needs polishing to get the worst of the abrasion scratches and watermarks out (see bottom pic) ...and I have to make 4 new feet. And the shift and rails need lubing and the keytops cleaning. I scoured the spotty growths from the platen with dry wire wool. So now it is shiny, but paper still feeds OK. 

But none of that really matters. The important thing is, it looks pretty damn good so far!

(Click pics to supersize)

Underwood Portable typewriter restoration

Wednesday 29 June 2011

Ribbontop's-a- gobo


Bobbin lid, reel shield, spool cowl ...ink-cap? Take your pick.

Here's all that's left of the branding on the Underwood Portable Typewriter. I'll try to polish some of those abrasion marks but steel's so much harder than alloy. Getting there...

Tuesday 28 June 2011

Beyond the pale

An update on my stripping of the Underwood 4

I'd harboured a hope that after the first application of Nitromors, I would be able to restore this 1930 Underwood 4 to its original finish. I tried to control the degree of paint removal by applying the paint stripper and leaving it for only short periods before rinsing and scrubbing it. But the glimmer quickly turned into a gleam as the aluminum began to show through, both as  normal wear patches at the corners of the keyboard and elsewhere. 

The original black was largely intact but the rear gold decals on the back were already softened and blurred by my first attempts and the original clear laquer had come off with the brown enamel. This left the black dull and lifeless. 

I'd generally consider it a sacrilege to rub down to bare metal on such an old typewriter but there wasn't much option to do anything else. I could have left it partially stripped but I'm not going to beat myself up about it. After the application by its former keeper of the brown enamel, this was never going to make a museum quality specimen - I reckon they made quite a few of this model. After a minute's reflection, I decided to go for it. The frame and front plate are both aluminium but the paper table and ribbon covers are steel and seem to be painted with different stuff which is harder to get off.

On the aluminium, I'm using 400 grit wet paper which I'll follow with 0000 grade steel wool, finishing up with Autosol chrome and alloy polish. I tried this routine on the back as a test and it seems to work OK.

After finishing, I'm not sure whether to clear laquer it to preserve the polished finish or paint it with some design or other. Suggestions welcome!

Tuesday 21 June 2011

Underwood stripper

Regarding the previous post: Shordzi asked about the brand of paint stripper I used to remove the hand-painted brown finish (I think it is model maker's enamel). The can recommends 40 minutes. I left it for 10 before dunking in a bucket of water, brushing and rinsing it off.

Warning: This softened the decals to some extent, especially on the back of the frame where I left it on for about 15mins. This means that the writing is indistinct. The underlying original finish seems unaffected by the stripper.


Tuesday 14 June 2011

Striptease


Un-painting this Olympia's box could end up being a lost cause. The promise of a fine wooden finish seems out of reach because of the tenacity of hammerite primer.

Richard commented he was curious about how these boxes were made: the bottom and two sides are solid wood and the curved top is steamed ply. They are nailed and glued with any gaps filled with... filler. In short, they were made to be painted. But the same heavy duty sanding which originally profiled the corners isn't proving anywhere near as effective at removing the paint.

I'll persevere a little longer before preserving with varnish and replacing the hardware.

Also, I'd thought I had an SM3 but the manual I downloaded from MLG suggests otherwise. There's no tabulation and the paper support isn't push-button operated. These are reffered to in the manual. It DOES have spring-loaded key tops though. Any helps with ID welcome. The SN is 728899.